Creating COM Projects
Working with COM type libraries
Microsoft COM interfaces and implementations of those interfaces are described on disk by type libraries. Type libraries can reside in stand-alone files with the extension .TLB, or within files containing executable code such as .DLL, .EXE, and .OCX files. Often the file that implements a COM component also contains the type library representing that component.
Open Dylan includes a tool that can read the contents of a type library and generate Dylan code to act as a client to the COM interfaces and classes the type library describes, or to act as a server implementing the type library’s interfaces and classes.
You can invoke this type library tool from a Open Dylan project by including a specification file in the project. A specification file describes what type library to translate and in what way the translation will be used. Specification files have the extension .SPEC. You can find more details about specification files in section The type library tool and specification files.
To make using the tool easier, the New Project wizard allows you to create a project containing a specification file.
An example COM server and client
The following example explains how the type library tool works and how to use the New Project wizard features that support it.
In the example, we will create COM server and client applications. We will write a simple encryption engine as a COM server, and write a simple client to that interface. In order to make things simpler, we have provided a COM type library describing the encryption interface.
Creating the server stubs library
First we use the New Project wizard to create a Dylan library defining server-side stubs for the encryption interface.
Choose File > New… from the main window.
Select Project and click OK.
The New Project wizard appears.
In the Project Type section, select “Interface to COM Type Library” and click Next.
The next page allows you to name a type library to be translated. Most COM components store the location of their type libraries in the Windows Registry. These registered type libraries are listed in the Installed Type Libraries section of the window. You can select a type library from the list, or click Browse… in the Location pane to select a type library file from disk.
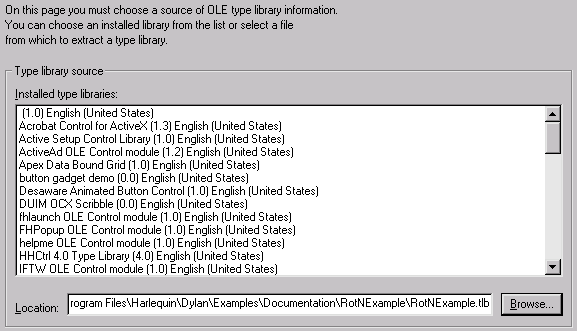
Choosing a type library file to convert.
In this case, we use a type library supplied with Open Dylan.
Click Browse… and navigate to the Open Dylan examples folder.
The folder required is called Examples and is placed under the top-level Open Dylan folder.
It is usually C:\Program Files\Open Dylan\Examples.
Go to the Documentation\RotNExample subfolder and choose the RotNExample.tlb file.
Click Next to continue to the next page of the wizard.
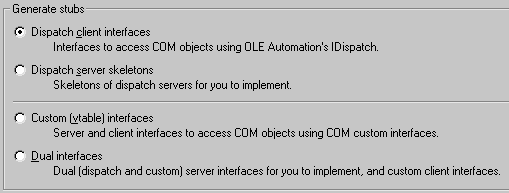
Choosing the kind of skeleton code to generate.
The next page allows you to choose what kind of stubs to generate from the type library. There are two options:
Dispatch client interfaces
Defines Dylan code to allow you to interface to COM servers.
Dispatch server skeletons
Defines Dylan code to allow you to create COM servers implementing the interfaces described in the type library.
Because we are writing the server side of the application, we want to generate dispatch server skeleton code.
Select “Dispatch server skeletons”.
Click Next to continue to the next page of the wizard.
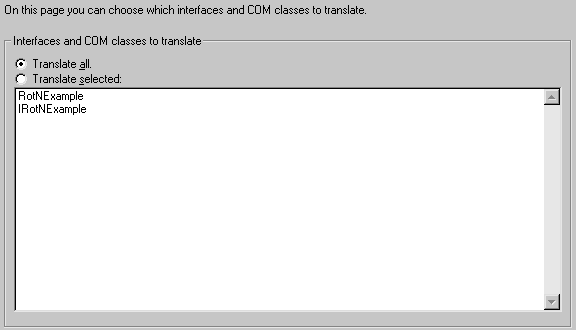
Choosing interfaces and classes from the type library.
The next page presents a list of COM classes and interfaces contained in the selected type library. You can select which to translate by choosing “Translate selected” and then clicking to select individual items, dragging or using the Shift key to select ranges, and using the Ctrl key to select additional items. Choose “Translate all” and all classes and interfaces in the type library will be translated. This is different from selecting all items under “Translate selected” because if classes or interfaces are added to the type library later, they will only be translated if you selected “Translate all”.
Choose “Translate all”, so that both the RotNExample COM class and the IRotNExample interface are translated.
Click Next.
Now we reach the Project Name and Location page. This and all subsequent pages are the same as those that you see for other kinds of project in the New Project wizard. Follow the remaining steps to finish defining the server stubs project.
Change the name of the project to RotNExample-server-stubs.
Choose a suitable Location for the project.
Make sure that the “Dynamic Link Library (DLL)” option is chosen in the Project Settings and Templates section.
Make sure that the “Include any available templates” option is not checked.
Click Next to continue.
We are now at the Use Libraries page. We are only defining the stubs for the server, so we do not need any unusual libraries.
Choose the “Minimal” option.
Click Next to continue.
We are now at the final page of the New Project wizard.
Make any changes you want to the Source File Headers section.
Click Finish.
The new project appears.
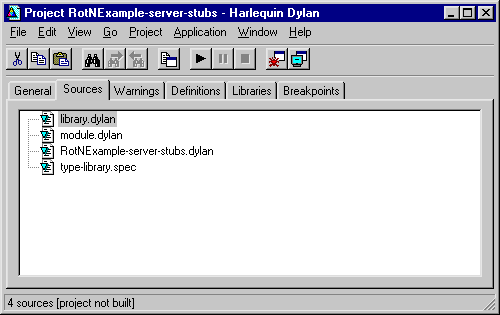
The server stubs project.
In addition to the usual files, this project contains a file named type-library.spec. This is a specification file. It provides information to the type library tool.
Double-click on the specification file.
An editor window opens on the specification file.
The specification file looks something like this:
Origin: COM-type-library
Type-library: C:\\Program Files\\Open Dylan\\Examples\\...\\RotNExample.tlb
Module: type-library-module
Module-file: type-library-module.dylan
Generate: dispatch-servers
Stub-file: stubs.dylan
As you can see, the specification file contains all the information provided to the type library portion of the New Project wizard.
However, no skeleton code has yet been generated. The type library tool, which generates the skeleton code, only runs when you build the project.
Build the project with Project > Build.
The build process adds some new files to the project. These files were generated by the type library tool.
The file type-library-module.dylan defines a module in which the translated code resides. This module exports all translated symbols. If you look at module.dylan, you will see that the main module re-exports all of these symbols.
The file stubs.dylan contains the Dylan code generated by the type library tool. It defines a class for an implementation of the IRotNExample interface, and generic functions for the methods and properties of the interface:
/* Dispatch interface: IRotNExample version 0.0
 * GUID: {822ED42A-3EB1-11D2-A3CA-0060B0572A7F}
 * Description: An example interface for Open Dylan's Getting
 * Started manual. */

define open dispatch-interface <IRotNExample> (<simple-dispatch>)
  uuid "{822ED42A-3EB1-11D2-A3CA-0060B0572A7F}";
  virtual property IRotNExample/key :: type-union(<integer>,
    <machine-word>), name: "key", disp-id: 12288;
  function IRotNExample/encrypt (arg-pre :: <string>) =>
    (arg-result :: <string>), name: "encrypt", disp-id: 24576;
  function IRotNExample/decrypt (arg-pre :: <string>) =>
    (arg-result :: <string>), name: "decrypt", disp-id: 24577;
end dispatch-interface <IRotNExample>;
define open generic IRotNExample/key (this :: <IRotNExample>) =>
  (arg-result :: type-union(<integer>, <machine-word>));
define open generic IRotNExample/key-setter (arg-result ::
  type-union(<integer>, <machine-word>), this :: <IRotNExample>)
  => (arg-result :: type-union(<integer>, <machine-word>));
define open generic IRotNExample/encrypt (this :: <IRotNExample>,
  arg-pre :: <string>) => (result :: <HRESULT>, arg-result ::
  <string>);
define open generic IRotNExample/decrypt (this :: <IRotNExample>,
  arg-pre :: <string>) => (result :: <HRESULT>, arg-result ::
  <string>);
This defines a class <IRotNExample> which implements the given
interface. The implementation is not complete until methods are provided
for the generics. This can be done by adding methods in the same
library, or by defining a subclass of <IRotNExample> in another
library and defining methods on the subclass. We will take the latter
approach.
There is also generated code corresponding to the COM class RotNExample from the type library:
/* COM class: RotNExample version 0.0
 * GUID: {C44502DB-3EB1-11D2-A3CA-0060B0572A7F}
 * Description: Implementation of IRotNExample.
 */

define constant $RotNExample-class-id = as(<REFCLSID>,
                                           "{C44502DB-3EB1-11D2-A3CA-0060B0572A7F}");
/* You should define your coclass something like this:
define coclass $RotNExample-type-info
  name "RotNExample";
  uuid $RotNExample-class-id;
  default interface <IRotNExample>;
end coclass;
*/
Note that the define coclass is within a comment, since you may want
to define a COM class based on a subclass of <IRotNExample>.
Creating the server
Now we create the actual server application.
Choose File > New… from the main window.
Select Project and click OK.
The New Project wizard appears.
In the Project Type section, select “GUI Application (EXE)” and click Next.
Name the project RotNExample-server.
Make sure that the “Include any available templates” option is not checked.
Make sure that “Production mode” is selected in the Compilation Mode section of the Advanced Project Settings dialog.
This option will be set already if you have been following all steps from the start of this chapter.
Click Next to continue.
Choose the “Simple” libraries option and click Next to continue.
Choose the “Standard IO streams and string formatting” option from “IO and system support”, and click Next.
Choose the “Win32 API” option from “GUI support”, and click Next.
Choose the “OLE Automation” option from “OLE Automation support” and click Next.
Choose the “NoneY” option from “Database support” and click Next.
Click Finish.
The RotNExample-server project window appears.
In the new project’s window, edit library.dylan, and add to the
define librarydeclaration the following line:
use RotNExample-server-stubs;
Add the same line to the
define moduledeclaration in module.dylan.
To implement the IRotNExample interface, we will create a subclass of
<IRotNExample>. Because <IRotNExample> was created with define
dispatch-interface, we must use define COM-interface to create
the subclass.
Note
The remainder of this section of the example involves adding code to RotNExample-server.dylan. A version of this file with all the code we add in this section is available in the Open Dylan installation folder, under Examples\Documentation\RotNExample\RotNExample-server.dylan. You may want to copy that file into place in your project folder rather than typing code in.
Add the following code to RotNExample-server.dylan.
define COM-interface <IRotN-implementation> (<IRotNExample>)
slot IRotNExample/key ::
type-union(<integer>, <machine-word>) = 13;
end;
If you add this by hand, make sure not to put it after the top-level call to main.
We provide here an implementation for the IRotNExample/key slot, which
was defined as a virtual slot in the superclass. This slot must accept
the <machine-word> type, since any 32-bit integer which does not fit
in the range of a Dylan <integer> will be passed as a
<machine-word>.
The next task is to define the IRotNExample/encrypt and
IRotNExample/decrypt methods. Although it is not obvious from the
definition of <IRotNExample>, these methods must take as their first
parameter the instance of <IRotN-implementation> they operate on, and
return as a first result a COM error code.
Add the following code to RotNExample-server.dylan.
define method IRotNExample/encrypt
(this :: <IRotN-implementation>, pre :: <string>)
=> (result :: <HRESULT>, post :: <string>)
if (instance?(this.IRotNExample/key, <integer>))
let post = make(<string>, size: pre.size);
for (char keyed-by index in pre)
post[index] := rot-char-by-n(char, this.IRotNExample/key);
end for;
values($S-OK, post)
else
values($E-INVALIDARG, "")
end if
end;
define method IRotNExample/decrypt
(this :: <IRotN-implementation>, pre :: <string>)
=> (result :: <HRESULT>, post :: <string>)
if (instance?(this.IRotNExample/key, <integer>))
let post = make(<string>, size: pre.size);
for (char keyed-by index in pre)
post[index] := rot-char-by-n(char, -this.IRotNExample/key);
end for;
values($S-OK, post)
else
values($E-INVALIDARG, "")
end if
end;
Note that this code is careful not to crash when IRotNExample/key is a
<machine-word>. $S-OK represents success. $E-INVALIDARG is a
generic failure representing some kind of invalid argument value.
The above method uses the rot-char-by-n function, which we must also add.
Add the following code to RotNExample-server.dylan.
define function rot-char-by-n
(char :: <character>, n :: <integer>)
=> (r :: <character>)
let char-as-int = as(<integer>, char);
local method rot-if-in-range
(lower :: <integer>, upper :: <integer>) => ()
if (lower <= char-as-int & char-as-int <= upper)
char-as-int := lower + modulo(char-as-int - lower + n,
upper - lower + 1);
end if;
end method;
rot-if-in-range(as(<integer>, 'a'), as(<integer>, 'z'));
rot-if-in-range(as(<integer>, 'A'), as(<integer>, 'Z'));
as(<character>, char-as-int)
end;
This function rotates alphabetic characters forward n positions, wrapping around if the character passes “Z”. When n is 13, this implements the classic Rot13 cipher often used to hide offensive material on USENET.
In order to create our server, we must also create a COM class for it.
Add the following code to RotNExample-server.dylan.
You may want to copy the define coclass code from stubs.dylan in
the RotNExample-server-stubs project and modify it.
define coclass $RotNExample-type-info
name "RotNExample";
uuid $RotNExample-class-id;
default interface <IRotN-implementation>;
end coclass;
Now we simply have to add a Windows event loop as the main body of the server program.
Modify the
mainmethod in RotNExample-server.dylan to look like the following.
define method main () => ()
if (OLE-util-register-only?())
register-coclass($RotNExample-type-info,
"Harlequin.RotNExample");
else
let factory :: <class-factory>
= make-object-factory($RotNExample-type-info);
with-stack-structure (pmsg :: <PMSG>)
while (GetMessage(pmsg, $NULL-HWND, 0, 0))
TranslateMessage(pmsg);
DispatchMessage(pmsg);
end while;
end with-stack-structure;
revoke-registration(factory);
end if;
end method main;
With this code in place, if the server is invoked from the command line
with /RegServer as an argument, OLE-util-register-only? will return
#t. The call to register-coclass creates a type library (with
extension .TLB) and registers the type library and the server itself in
the Windows registry.
Note that the server provides no way to exit. We can make it exit whenever our interface object is destroyed. This is a little simplistic, since it does not correctly handle the case in which two servers are created, but it will suffice for our example.
Add the following code to RotNExample-server.dylan.
define method terminate (this :: <IRotN-implementation>) => ()
next-method();
PostQuitMessage(0); // Cause main event loop to terminate.
end;
The PostQuitMessage call causes the next call to GetMessage (in
the main event loop) to return #f, and thus cause the program to exit.
Build the project with Project > Build.
During the build, you will be prompted for the location of the project file RotNExample-server-stubs.hdp.
Creating the client stubs library
Now we create a project for the client-side stubs of the encryption interface.
Choose File > New… from the main window.
Select Project and click OK.
The New Project wizard appears.
In the Project Type section, select “Interface to COM Type Library” and click Next.
Click Browse… and navigate to the Open Dylan examples folder.
The folder required is called Examples and is placed under the top-level Open Dylan folder.
It is usually C:\Program Files\Open Dylan\Examples.
Go to the Documentation\RotNExample subfolder and choose the RotNExample.tlb file.
Click Next to continue to the next page of the wizard.
Select “Dispatch client interfaces” and click Next to continue to the next page of the wizard.
Choose “Translate all” on the next page, so that both the RotNExample COM class and the IRotNExample interface are translated. Click Next.
Change the name of the project to RotNExample-client-stubs.
Choose a suitable Location for the project.
Make sure that the “Dynamic Link Library (DLL)” option is chosen in the Project Settings and Templates section.
Make sure that the “Include any available templates” option is not chosen.
Click Next to continue.
We are now at the Use Libraries page. We are only defining the stubs for the client, so we do not need any unusual libraries.
Choose the “Simple” option and click Next.
Choose the “Standard IO streams and string formatting” option from “IO and system support”, and click Next.
Choose the “Win32 API” option from “GUI support”, and click Next.
Note that the “OLE Automation” option on the “OLE Automation support” page is automatically selected. That is what we want.
Click Next.
Choose the “None” option from “Database support” and click Next.
We are now at the final page of the New Project wizard.
Make any changes you want to the Source File Headers section.
Click Finish.
The new project appears.
As with the server stubs project, we have to build this project to make the type library tool run.
Build the project with Project > Build.
As before, files are added to the project. The type-library-module.dylan file serves the same purpose as with the server stubs. The difference is that stubs.dylan contains different code. It defines a dispatch-client class for the IRotNExample interface:
/* Dispatch interface: IRotNExample version 0.0
* GUID: {822ED42A-3EB1-11D2-A3CA-0060B0572A7F}
* Description: An example interface for Open Dylan's
* Getting Started manual.
*/
define dispatch-client <IRotNExample>
uuid "{822ED42A-3EB1-11D2-A3CA-0060B0572A7F}";
property IRotNExample/key :: type-union(<integer>, <machine-word>), name: "key",
disp-id: 12288;
function IRotNExample/encrypt (arg-pre :: <string>) =>
(arg-result :: <string>), name: "encrypt", disp-id: 24576;
function IRotNExample/decrypt (arg-pre :: <string>) =>
(arg-result :: <string>), name: "decrypt", disp-id: 24577;
end dispatch-client <IRotNExample>;
This defines a class <IRotNExample> which allows a client to use the
described interface.
There is also generated code corresponding to the COM class RotNExample from the type library:
/* COM class: RotNExample version 0.0
* GUID: {C44502DB-3EB1-11D2-A3CA-0060B0572A7F}
* Description: Implementation of IRotNExample.
*/
define constant $RotNExample-class-id =
as(<REFCLSID>, "{C44502DB-3EB1-11D2-A3CA-0060B0572A7F}");
define function make-RotNExample ()
=> (default-interface :: <IRotNExample>)
let default-interface = make(<IRotNExample>,
class-id: $RotNExample-class-id);
values(default-interface)
end function make-RotNExample;
This function creates an instance of the RotNExample COM class, and returns its default (and only) interface.
Creating the client
Now we create the actual client application.
Choose File > New… from the main window.
Select Project and click OK.
The New Project wizard appears.
In the Project Type section, select “Console Application (EXE)” and click Next to continue to the next wizard page.
Name the project RotNExample-client.
Choose a suitable Location for the project.
Make sure the “Include any available templates” option is not chosen.
Click Next.
Choose the Simple libraries option, and choose the “Standard IO streams and string formatting” and “OLE Automation” options.
Proceed to the last page of the wizard and click Finish.
In the new project, edit library.dylan, and add to the
define librarydeclaration the following line:
use RotNExample-client-stubs;
Add the same line to the
define moduledeclaration in module.dylan.
We now add code to make the client encrypt and decrypt a simple string with the default key of 13 and with the key set to 3.
Note
The remainder of this section of the example involves adding code to RotNExample-client.dylan. A version of this file with all the code we add in this section is available in the Open Dylan installation folder, under Examples\Documentation\RotNExample\RotNExample-client.dylan. You may want to copy that file into place in your project folder rather than typing code in.
Modify the
mainmethod in RotNExample-client.dylan to look like the following.
define method main () => ()
with-ole
format-out("Client connecting to server.\\n");
let server = make-RotNExample();
local method encrypt-and-decrypt () => ()
let plaintext = "And he was going ooo-la, oooooo-la...";
format-out("Plaintext is %=, encrypting.\\n", plaintext);
let ciphertext = IRotNExample/encrypt(server, plaintext);
format-out("Ciphertext is %=, decrypting.\\n", ciphertext);
let decrypted = IRotNExample/decrypt(server, ciphertext);
format-out("Decrypted text is %=.\\n", decrypted);
end method;
encrypt-and-decrypt();
server.IRotNExample/key := 3;
format-out("Set key to %d.\\n", server.IRotNExample/key);
encrypt-and-decrypt();
format-out("Client releasing server.\\n");
release(server);
end with-ole;
end method main;
The with-ole macro initializes OLE at entry and uninitializes it at
exit.
Build the project with Project > Build.
During the build, you will be prompted for the location of the project file RotNExample-client-stubs.hdp.
Testing the client and server pair
The best way to test the client and server pair is from within the Open Dylan environment, so that we can use the debugger if either application fails.
First we must register the server with the system, so that COM knows
where to find the server and what interfaces it supports. In order to do
this, we must execute the server with the /RegServer command line
flag. This will cause the server’s call OLE-util-register-only? to
return #t, and the server to call register-coclass.
Open the RotNExample-server project and build it.
Select Project > Settings… in the RotNExample-server project window.
The Project Settings dialog appears.
On the Debug page, put /RegServer in the Arguments field, and click OK.
Start the RotNExample-server application.
The server application registers itself and exits immediately. You can tell that the server has exited by watching the stop button in the project window become unavailable.
Now that the server is registered, it can be invoked by the client. But we are going to start the server manually in the environment before starting the client. That way, if the server fails, we can debug it in the environment.
First, however, we need to remove the /RegServer argument from the project settings, so that the server can run normally.
Select Project > Settings… in the RotNExample-server project window.
The Project Settings dialog appears.
On the Debug page, remove /RegServer from the Arguments field, and click OK.
Start RotNExample-server.
Start RotNExample-client.
The client should execute, and print something like this:
Client connecting to server.
Plaintext is "And he was going ooo-la, oooooo-la...", encrypting.
Ciphertext is "Naq ur jnf tbvat bbb-yn, bbbbbb-yn...",
decrypting.
Decrypted text is "And he was going ooo-la, oooooo-la...".
Set key to 3.
Plaintext is "And he was going ooo-la, oooooo-la...", encrypting.
Ciphertext is "Dqg kh zdv jrlqj rrr-od, rrrrrr-od...",
decrypting.
Decrypted text is "And he was going ooo-la, oooooo-la...".
Client releasing server.
Creating vtable and dual interfaces
The New Project wizard can generate custom (vtable) and dual (vtable and dispatch) COM interfaces. They are available on the wizard’s stub-selection page, from the options “Custom (vtable) interfaces” and “Dual interfaces”.
Because custom and dual interfaces generate both server and client interfaces, it is necessary to ensure that the names of the server and client interfaces do not collide. Thus when either of these is selected an additional page appears for specifying suffixes for the names of the generated interfaces.
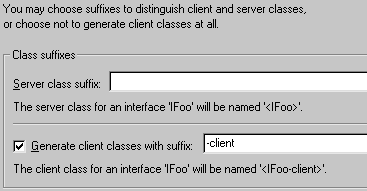
Custom and dual interface class suffix selection.
The server class suffix is appended to the name of the interface when
generating the server class name. For example, if the server class
suffix is -server then the server class for an interface IBar is
named <IBar-server>.
The supplied client class suffix is appended to the name of the
interface to generate the client class name. If the “Generate client
classes with suffix” box is not checked, no client classes are
generated, and client methods specialize on <C-Interface> instead.
The type library tool and specification files
The type library tool is invoked any time you build a project which includes a a type library tool specification, or .SPEC, file. This is a text file, where the first line must be:
Origin: COM-type-library
This line identifies that the type library tool should be used to process the file. When it runs, the type library tool will regenerate the module and stub files when they do not exist, or if the .SPEC file has been modified more recently then the last build.
Type library tool specification files can contain the following keywords:
- Type-library:
SPEC file keyword
Type-library: *typelibrary-path*
Required. Specifies the pathname of the type library to translate. If typelibrary-path is a relative path, it is considered to be relative to the location of the specification file.
- Module-file:
SPEC file keyword
Module-file: *module-file-to-generate*
Required. Specifies the pathname of the module file to generate. The file will be created, if necessary, and added to the project, if necessary.
- Module:
SPEC file keyword
Module: *module-name-to-generate*
Required. The name of the module definition to generate. This module definition is placed in the file module-file-to-generate.
- Stub-file:
SPEC file keyword
Stub-file: *stub-file-to-generate*
Required. Specifies the pathname of the Dylan source file to generate. This file will be created, if necessary, and added to the project, if necessary.
- Generate:
SPEC file keyword
Generate: *type-of-stubs*
Required. Determines what type of stubs are generated in the file specified using Stub-file:. Possible values of type-of-stubs are:
- dispatch-clients
Dispatch client code is generated, using
define dispatch-client.- dispatch-servers
Dispatch server code is generated, using
define dispatch-interface.- vtable-interfaces
Custom (vtable) interfaces are generated, using
define
vtable-interface
. The names of server interfaces are affected by the value of Server-suffix: (below). The names of client interfaces and whether client interfaces are generated are affected by the presence and the value of Client-suffix: (below).- dual-interfaces
Dual (vtable and dispatch) interfaces are generated, using
define
vtable-interface
. The names of server interfaces are affected by the value of Server-suffix:. The names of client interfaces and whether client interfaces are generated are affected by the presence and the value of Client-suffix:.
- Server-suffix:
SPEC file keyword
Server-suffix: *server-suffix*
Optional. Only meaningful when Generate: ‘s type-of-stubs argument is vtable-interfaces or dual-interfaces. Specifies a suffix which is appended to generated server interface names. If no value is provided or the Server-suffix: keyword is omitted then no suffix is appended.
- Client-suffix:
SPEC file keyword
Client-suffix: *client-suffix*
Optional. Only meaningful when Generate: ‘s type-of-stubs argument is vtable-interfaces or dual-interfaces. Specifies a suffix which is appended to generated client interface names. If the Client-suffix: keyword is omitted then client classes are not generated (the client-class clause is not provided to the define vtable-interfaces or define dual-interfaces macro invocation). To generate client classes but not append a suffix, an empty value must be provided to the Client-suffix: keyword. For example:
Client-suffix:
- Interfaces:
SPEC file keyword
Interfaces: *interfaces-and-coclasses-to-translate*
Optional. If provided, specifies the names of the interfaces and COM classes to translate. If not provided, all interfaces and COM classes are translated. All interfaces or COM classes after the first listed should be provided on a new line, preceded by a tab or spaces. For example:
Interfaces: IInterfaceOne
            InterfaceOneCoclass
            IInterfaceTwo
            InterfaceTwoCoclass